Author: Rob P.

Longitudinal Projects in REDCap

Certain research studies seek to capture the same data over time in order to track change and progress. Longitudinal projects in REDCap enables smooth, timely data collection and minimizes the set-up burden of repeated instruments.

Applying longitudinal mode allows any form or survey to be reused at multiple times. This eliminates the need to recreate the same form for individual time points. Instead, the form is created once and then assigned to various time points throughout the project as desired.

Examples of forms that are frequently used in longitudinal mode include:

  • Medications
  • Lab results
  • Visit questionnaires
  • Quality of life questionnaires
  • Scoring tools
  • Adverse events forms
  • Surveys

Longitudinal Setup

First, enable longitudinal mode at the project level.

  1. Navigate to your project
  2. Select the “Project Setup” tab or link
  3. Select the “Enable” button next to “Use Longitudinal data collection with defined events”

Next, define events for the project.

After enabling longitudinal mode, look at the “project setup” page for the “Define your events and designate instruments for them” module. An “event” may be a temporal event in the course of the project such as a participant visit or a task to be performed.

  1. Navigate to “Define my Events”
  2. Input the title of the event in the text box
  3. Select “Add new event”
  4. Repeat steps 2-3 for all of your events

Finally, link the instruments to the relevant events.

  1. Navigate to “Designate Instruments for My Events”
  2. Select “Begin Editing” button
  3. Select the checkbox on the grid for each form/survey that should be assigned to each event.
  4. Select “Save”

Note: In order to ensure that other advanced features in REDCap work properly, always assign the first form to the first event.

This REDCap Tip of The Month content was developed in collaboration with the Institute of Translational Health Sciences, the University of Washington CTSA.

Adding Confirmation Emails

Have you ever wanted REDCap to automatically send a confirmation email whenever a respondent completes your survey?

The use of a confirmation email is a great way for you to thank the respondent. It is also a useful way to send respondents a copy of any pertinent information related to the survey they just completed.

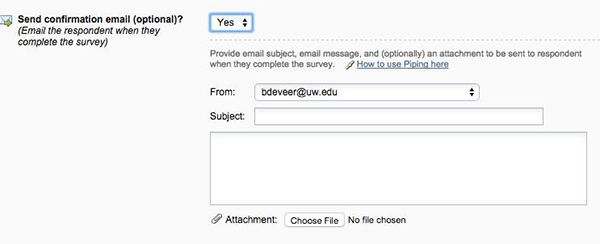
You can find the confirmation settings on the Survey Settings page for a given survey in the Online Designer.

REDCap Online Designer

The email confirmation setting allows you the option of adding one attachment to the email. You can also use piping in the email’s subject line and in the message itself to help personalize the email.

Confirmation Settings

This REDCap Tip of The Month content was developed in collaboration with the Institute of Translational Health Sciences, the University of Washington CTSA.
Using HTML in REDCap

Have you ever wanted to emphasize text in your survey to alert your study staff or highlight an important question? REDCap does not have this customization built into the online designer but you can add HTML to customize your forms and surveys.

What is HTML? HTML stands for “Hyper Text Markup Language” and is a simple programming language for describing web pages in ordinary text. HTML uses “tags” to describe the behavior you would like to show on the page. Tags are like keywords and are sandwiched between less-than and more-than symbols “< >” that tell the browser to display content in a particular way. For example, in “<u>” the u is a tag in html that tells the browser to show the text as underlined. The majority of tags consist of two parts, the opening and closing tags. These tell the browser where to start and stop the customization. A closing tag is indicated by using a forward slash symbol directly after the less-than symbol “</ >”. In the “underline” example, everything between the opening tag and the closing tag will be displayed as underlined.

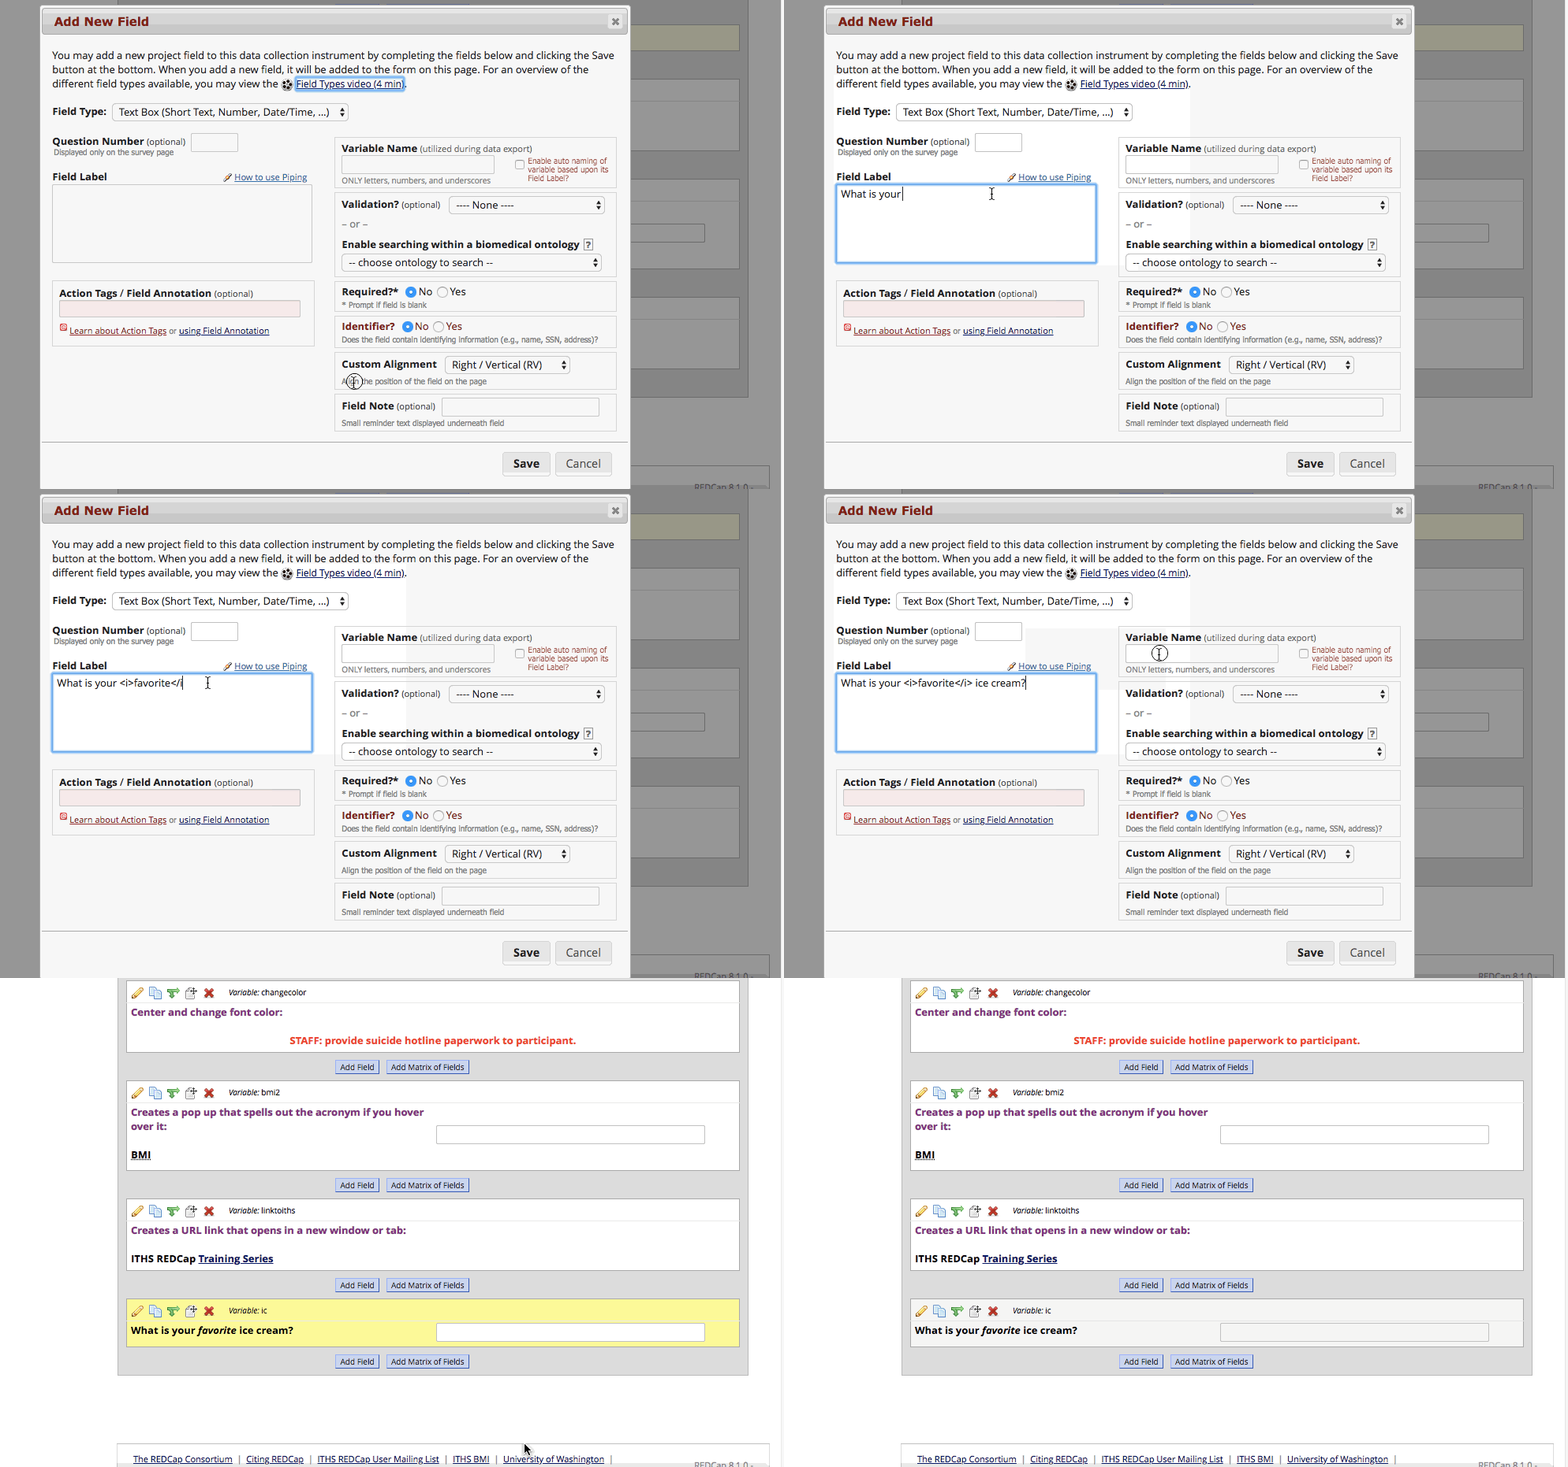
To use these HTML tags in REDCap you will navigate to the online designer, select the variable you wish to customize, and then input the HTML tag in the field label. Check out the following example for step by step instructions.


HTML Demo>

Here are some examples and corresponding tags on the ITHS website for the most frequently used HTML customizations in REDCap. Demo Provided by ITHS.- HTML Demo Project.  There are a variety of additional HTML tags that can be used; feel free to be creative! Combining HTML tags will allow you to create multiple customizations within the same section (such as underlining and italicizing the same chunk of text).

This REDCap Tip of The Month content was developed in collaboration with the Institute of Translational Health Sciences, the University of Washington CTSA.
Custom Labels for Repeatable Forms

Now that projects can have repeating forms, you may want a clearer description between repeated iterations of each form. In order to easily distinguish between the repeated forms, you can set up a custom label to help identify which form is which.

Setting up a label for any given form is done through the “repeatable instruments and events” setup section in the project setup page. Labels are created with variables present within the form itself.  Once you determine which variable and value you will use, you can create the label. See the examples below.

Some suggestions for variables to display are:
  • Adverse events: date of the adverse event
  • Scoring tools: the total score calculation
  • Family history: name of the family member
You can also combine 2 or more variables and include text if you want. For example:
  • “Adverse Event Date: [ae_date]” becomes “Adverse Event Date: 01/01/2017”
  • “Score: [total_score]” becomes “Score: 15”
  • “[relation]: [last_name], [first_name]” becomes “Father: Doe, John”

How to Set a Time Limit for Survey Completion

For some studies, it may be beneficial to impose a limit on the amount of a time a survey participant has to complete a given survey. For example, if you send participants a weekly survey, you might want to require that survey be completed within a week of receiving the invitation so that the participant does not inadvertently enter data for the wrong week.

Survey time limits can be defined in days, hours, minutes, or a combination of all three units. This option is set up for each survey individually and can be found in the “survey settings” menu on the online designer page.

Each survey will have a unique “timer” that starts the moment the invitation gets sent out via REDCap, whether it is a personal invitation or an automated invitation. This means that distinct survey participants may have different expiration dates for each of their respective surveys.

Things to keep in mind when imposing survey time limits:

This feature does not impose a time limit when opening a survey (e.g. this survey needs to be completed within 25 minutes).
Since the clock starts ticking upon invitation, regardless of when the participant opens the survey, be sure to use a large enough time frame.
It is a good idea to mention the time limit within the survey invitation so the participant is aware of the restriction.
Survey time limits can only be applied to surveys that have a unique survey link associated with them. Public survey links are excluded from using this feature.

Check out the following example for step by step instructions on how to define a time limit for survey completion.

Response and Time Limit for Surveys

This REDCap Tip of The Month content was developed in collaboration with the Institute of Translational Health Sciences, the University of Washington CTSA.
Action Tag Spotlight: @NOW and @TODAY

Have you ever wondered how to include an automatic time stamp as part of your official REDCap data set? Consider using either the @NOW or the @TODAY action tags. When @TODAY is applied to a text field, REDCap will automatically track the date in which the survey was opened and record the data to that field. For @NOW, REDCap will record the date and time.

Note, when a survey participant opens the form, REDCap records the local time on that device, so there may be variation depending on the time zone.

How to Apply @NOW or @TODAY

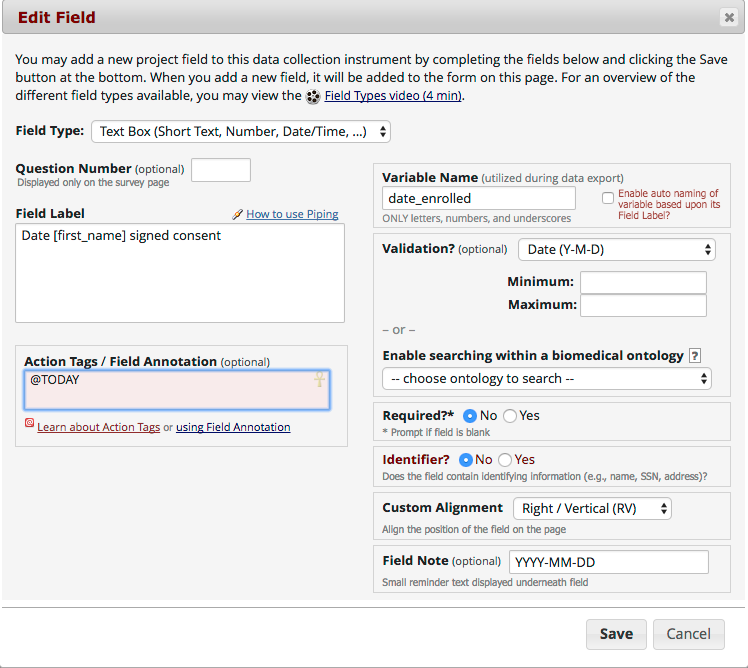
  • To add either of these action tags, type “@NOW” or “@TODAY” in the action tag box.
  • In order to apply the @NOW and @TODAY, validation type is needed. Action Tag @NOW must have a validation type that includes both the time and date, for example with the term “datetime” in the title. For @TODAY, the validation type only needs to include the date.
  • These two action tags can only be used in text fields.
Action Tag @NOW @TODAY

The @NOW and @TODAY action tags are mutually exclusive, but each of them can be individually combined with other action tags like @HIDDEN or @READ-ONLY.

This REDCap Tip of The Month content was developed in collaboration with the Institute of Translational Health Sciences, the University of Washington CTSA.
Personalize Survey Invitations

Have you ever wanted to personalize your surveys to help increase your completion rate? If so, then you might want to try REDCap’s “Piping” feature.

Piping allows you to display any entered variable, such as someone’s name, in that survey throughout the survey itself or in the thank you message at the end.

For example, you want to say, “Thank you, [survey participant’s first name],” at the end of your survey; or you might want to refer to the participant by name in follow-up questions throughout the survey.

To use the Piping function in REDCap:

  1. Look up the Variable Name of the first name field in the survey (i.e., “first_name”).
  2. Go to the location of the text in which you want to “pipe” the information. For example, “Survey settings for the Thank you message,” or “Field label for other variables.”
  3. Enter your text in the chosen location. For example, “Thank you, [first_name]!” or “[first_name]’s Date of Birth.”
  4. Hit the save button


This REDCap Tip of The Month content was developed in collaboration with the Institute of Translational Health Sciences, the University of Washington CTSA.

Create Mobile-Friendly Survey Buttons

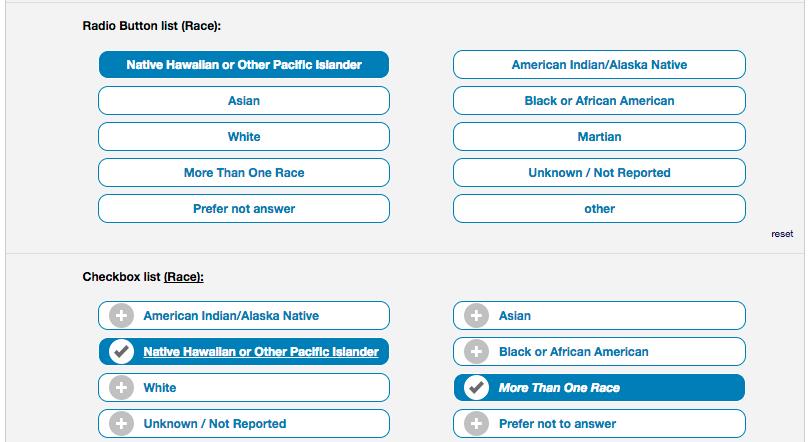
Ever find yourself zooming in on REDCap surveys just so you can tap the correct tiny button? With new mobile-friendly radio buttons and checkboxes, you can avoid fat-finger syndrome once and for all.

These larger, enhanced buttons make it easier to complete surveys and enter data on smaller devices like tablets and phones.

Note: the enhanced buttons can only be activated for surveys and not for normal data entry.

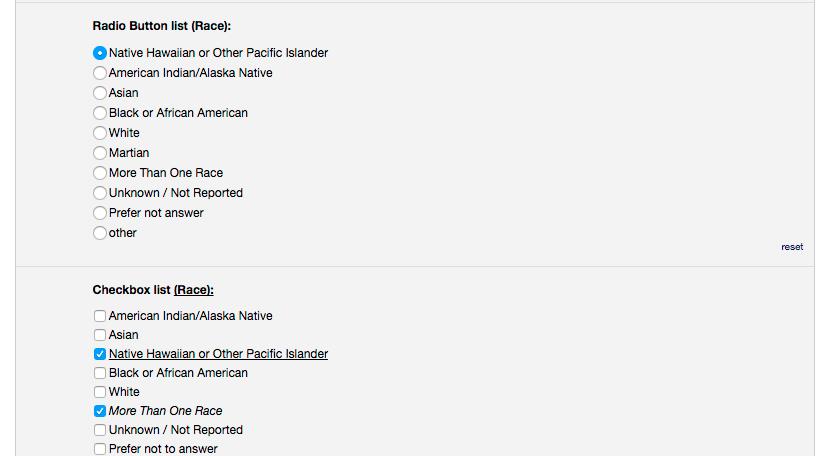
Normal radio buttons and checkboxes:

r-2_sept_1

Enhanced buttons:

r-2_sept_2

To activate the enhanced buttons, navigate to the Survey Design Options section of the survey settings page (found in the online designer).

r-2_sept_3


The standard buttons are the default. You can switch to the enhanced version at any time. Just remember to hit the save button at the bottom of the survey settings page.

This REDCap Tip of The Month content was developed in collaboration with the Institute of Translational Health Sciences, the University of Washington CTSA.
How to Run Weekly Survey Reports

If you run a continuous survey, you may want to run a weekly or monthly report to get an overview of what was submitted. Follow these steps to set up reporting in your REDCap project.

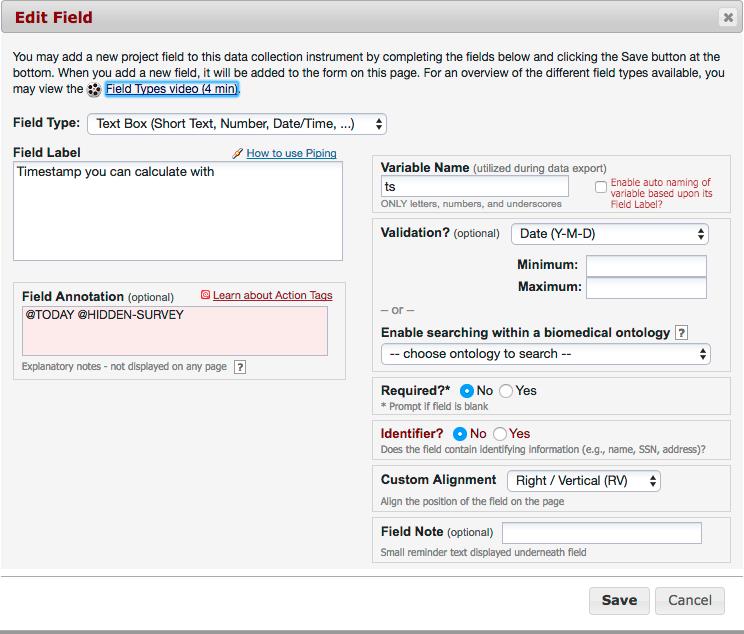
Step 1: Add a timestamp variable.

First, add a text variable with the YMD validation and tag that field with the action tags @TODAY and @HIDDEN. If you don’t know how to add action tags, check out our tip on that topic.

This will add a hidden field that will be automatically populated with today’s date. The survey participant will not see this field. We need this field because the normal REDCap survey timestamp is unfortunately not accessible in the reporting tool.

r-4_nov_1

Step 2: Create the report.

Now that we have a variable with a timestamp, we can incorporate it in a report. There are two ways of doing that: dynamically or static.

The Static Method
You will create a report like you normally do in the “Data Exports, Reports, and Stats” menu. Select the appropriate variables, give the report a name, and create a filter with an upper and lower bound date in the Filter section of the report builder. See the example below.

r-4_nov_2

This report will always pull the surveys submitted within the specified date range. If you need to change the date range, you can do that by editing the report.

The Dynamic Method
This method is very similar to the static method, except you will need to write custom logic to make this report dependent on today’s date. First, you’ll need to switch the filter to the custom syntax mode instead of the drag and drop wizard. Click the “Use advanced logic” link next to the “Switch format” tag to do so.

r-4_nov_3

You can then add your custom logic. For example, to pull all the survey results from the last seven days, add the following logic: ((datediff(“today”,[ts],”d”,”ymd”,true))<=0) and ((datediff(“today”,[ts],”d”,”ymd”,true))>=-7)

r-4_nov_4

You will need to customize this code by replacing the “[ts]” with the variable name that you’ve chosen for the time stamp variable in the first step. If you want to select a different dynamic range, change the “0” and the “-7” in the example to the desired range, (e.g. to look at the last month, the values would be “0” and “-30”).

This REDCap Tip of The Month content was developed in collaboration with the Institute of Translational Health Sciences, the University of Washington CTSA.

Organize Project Folders

Have you ever wished you could better organize how REDCap displays your various projects within the “My Projects” tab? You now have the option of creating project folders to address this issue.

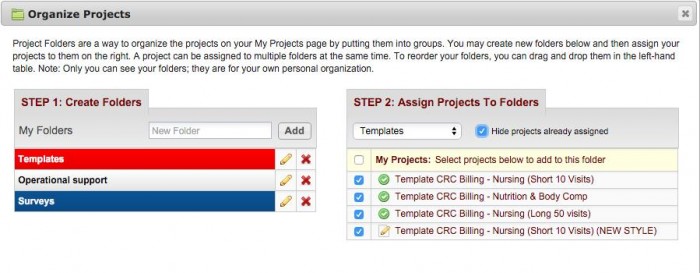
To create a project folder, navigate to the “My Projects” tab and click the newly added “Organize” button. The following popup will allow you to define your project folders with a name and custom colors. You can then assign projects—both active and archived ones—to a category.

Organizing projects is unique for each REDCap user, meaning one user’s approach to organization will not change someone else’s if both have access to the same project. Project organization will also not impact the data contained in a project in any way.

Each folder is collapsible, which allows for uncluttered navigation as seen in the following image. In addition, the order of projects can be changed by dragging and dropping the folders in the “Organize Projects” popup.

This REDCap Tip of The Month content was developed in collaboration with the Institute of Translational Health Sciences, the University of Washington CTSA.