Obtaining a Copy of the Program
For information on obtaining and using a copy of the Urn Randomization Program, please contact Janice Vendetti at the UConn School of Medicine, Department of Public Health Sciences, 263 Farmington Avenue, Farmington, CT 06030-6325. Email: vendetti@uchc.edu. The file UCHC_URN.exe will be sent to you.
Installing the Program and Starting It
The file, UCHC_URN.EXE is the DOS program file that runs the Urn Randomization procedure. If you run Microsoft Windows on your system, it is recommended that you exit Windows before running the program.
-
- In Windows Explorer, create a folder or directory called PROJECT on the top level your computer’s C hard drive (i.e. C:\PROJECT)
- Copy the file UCHC_URN.EXE to the directory C:\PROJECT
- Exit Windows Explorer
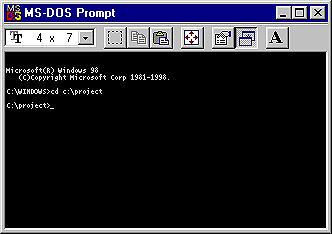
- Open a Microsoft DOS or Command Prompt dialog box, at the C:\Windows prompt change the directory to the C:\PROJECT directory by typing “cd c:\PROJECT” (without quotes) at the prompt. Hit the Enter key. Your MS Dos screen should look like this dialog box when finished with this step:
- Once in the C:\PROJECT directory, type “UCHC_URN.EXE” (e.g. UCHC underscore urn dot exe, all one word, without the quotes) to start the program. Your MS DOS window should now look like this window below:
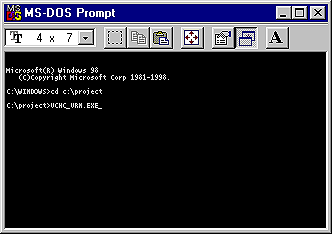
After typing UCHC_URN.EXE, hit the enter key to start the Urn Randomization program.
Using the Program
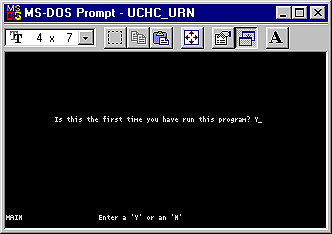
Once you start the program, it will check to find pre-existing data files in the C:\PROJECT directory. If you have previously entered data into the program (i.e., designed a study and entered information), it will take you to a menu of options. Otherwise, if the program does not find any data files, it asks:
Is this the first time you have run this program?
Enter a ‘Y’ or an ‘N’
If you have not created a study and answer “N” for no, the next screen will read:
UCHC_URN must be in the same directory as of its data files
Hit any key
Once you hit any key on your keyboard, it will bounce you out of the Urn Program. You must restart the program at the prompt.
For our example, we’ll assume this is the first time you have used the program and we shall take you through a series of exercises to set up a fictional “Rabbit Nutrition” study where we have three randomization groups and two balance variables. At the initial “Yes/No” prompt, you should enter an “Y” since we assume you have not used the program before and need to set up a study.
Naming Your Study
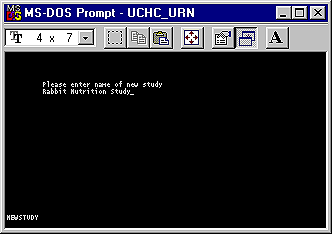
After answering ‘Y’ at the first screen, the next screen says:
Please enter name of new study
For our example, we are performing a nutritional study on rabbits. At the name of the new study prompt, type Rabbit Nutritional Study as the name of the fictional research study. The MS Dos window should look like this. If it does, hit the enter key.
Defining Outcome (Randomization) Groups
After you name the study, the program will ask you to define your outcome groups. In this context, the term “outcomes” refers to your randomization groups. You may only choose 2 or 3 outcomes. The program asks:
How many outcome assignments are there?_
2 or 3
In our Rabbit Nutrition Study, we have “3” groups that we want to randomize to: a carrot group, a lettuce group, and a cat food group. Type a 3 for our three randomization groups after the outcome assignment prompt.
The subsequent screens will ask you:
Enter name of 1st (2nd, 3rd) outcome:_
Since we have three outcomes, at the prompts we will enter for the 1st outcome, carrot group, second outcome, lettuce group, and third outcome, cat food group and hit enter after each group. Before you hit the last enter after the cat food group, your screen should look like this:

Defining the Balance Variables
After creating the randomization groups, the program will then ask:
How many variables are there? _
Enter a number from 2-20
In this context, the ‘variables’ refer to the characteristics you would like balanced among outcome groups. You can select up to 20 variables on which to balance (e.g. gender, ethnicity, age group, etc.). Each variable can have up to 10 options (e.g., gender has two, male or female). These balancing variables must be categorical.
In our fictional Rabbit Nutrition study, we will balance on “2” variables (sex and recruitment location). At the variable prompt, enter the number 2 since we have two variables. You then will need to define each of the variables by naming them and labeling their response categories (i.e. buck and doe, we’re sexing rabbits remember!).
Sex Variable
The program will lead you through a series of prompts.
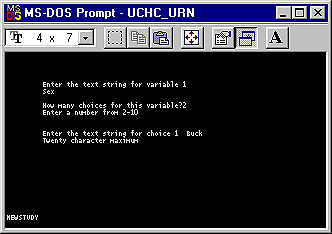
Enter the text string for variable 1_
At the prompt, type Sex and press the enter key.
How many choices for this variable?
Enter a number from 2-10
At the prompt, enter 2 since our sex variable has two response categories. Since we specified two response categories, the program will prompt us to enter a string name for each category. Each response string can have up to 20 characters.
Enter the text string for choice 1
Twenty character maximum
For the text string for choice 1, type Buck and hit enter. A buck is a male rabbit.
Enter the text string for choice 2
Twenty character maximum
For the text string for choice 2, type Doe and hit enter. Like deer, a doe is a female rabbit.
Recruitment Location Variable
A new screen will appear to create the information for the second balancing variable. Just like our previous variable, follow the prompts for the recruitment site variable. Define the name of the variable, recruitment location, specify the number of response categories, three, and label the variable categories, pet store, rabbit farm, and backyard.
Once you have entered your balance variables, you have concluded the setup of a new study. “Open Study” will appear at the bottom of the urn screen.
Menus
Either at the completion of setting up a study or, if one is already created, upon selecting a particular study from the Main Menu, the screen displays a set of 6 study-specific options from which to choose.
Open Study Menu

- View study info allows you to look at the study design, including what outcome (randomization) assignment groups are defined, how many variables are being balanced on and the choices for balancing variables.
- View urns allows you see the current distribution of the randomization procedure.
- Add subject allows you to enter new subjects. You should carefully record and double-check the ID of the subject you are entering so that you will be able to view this subject later. After you enter the subject data, the last screen will indicate the randomization group to which the subject was assigned.
- View Subject will allow you look at the urn characteristics and assignment group of any given subject, one at a time. You must enter the ID of the subject you wish to review.
- Remove subject allows you to delete a subject. Upon doing so, the urns will re-adjust as if the subject had never been entered.
- Go Back takes you to back to the Main Menu
Main Menu
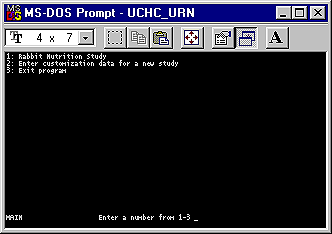
This menu is displayed when you start the Urn Program, and have already defined at least one study. It allows you to:
- Enter a pre-exiting study
- Enter customization data for a new study, or
- Exit the Urn Program.
Review
Once you have read through these instructions and set up a study (or studies), we recommend that you take time to experiment with the program by entering some subjects, deleting some subjects, and getting a feel for how the urn randomization works. Once you have a better understanding of how it operates, you can delete everything in the C:\PROJECT directory (except for UCHC_URN.EXE) and begin using it to randomize subjects into your study.
Known Bugs
The following are problems that have been reported to us concerning the program. Please be aware of these as you use the urn randomization procedure. Future modifications may be made as we collect more data from the field.
No way to back out of screens
There isn’t an easy way to back out of the screens. For example, if you choose the menu option “Remove Subject” by mistake, there’s no clear way to get back to the other menu options without deleting a subject and then re-entering. You can try using Control-C.
Out of range values and viewing the subject results in $||^ for out of range values
If a balancing variable has, for example, two options such as (male=1) and (female=2) the program will allow you to enter an out of range number such as “9” and continues to randomize the subject. When you “view” the subject, there are symbols ($||^) for those variables that are out-of-range and correct answers for those variables that were entered correctly. The subject is nevertheless assigned to a randomization group. Enter data carefully and check subjects data throughout the trial! If an error such as this occurs, you will need to delete the subject and the re-enter.
Cannot view total counts of observations
There is no way to view total counts of observations except via the built-in print screen routine of DOS.
Going back beyond 10
The GO BACK menu option won’t allow you to go beyond 10 if you have a lot of sites or studies.